Point Of Sale (POS)
This guide walks you through the common tasks you'll perform using the xPOS system.

Processing a Sale
Starting a New Transaction
Ensure you're at the main POS screen.
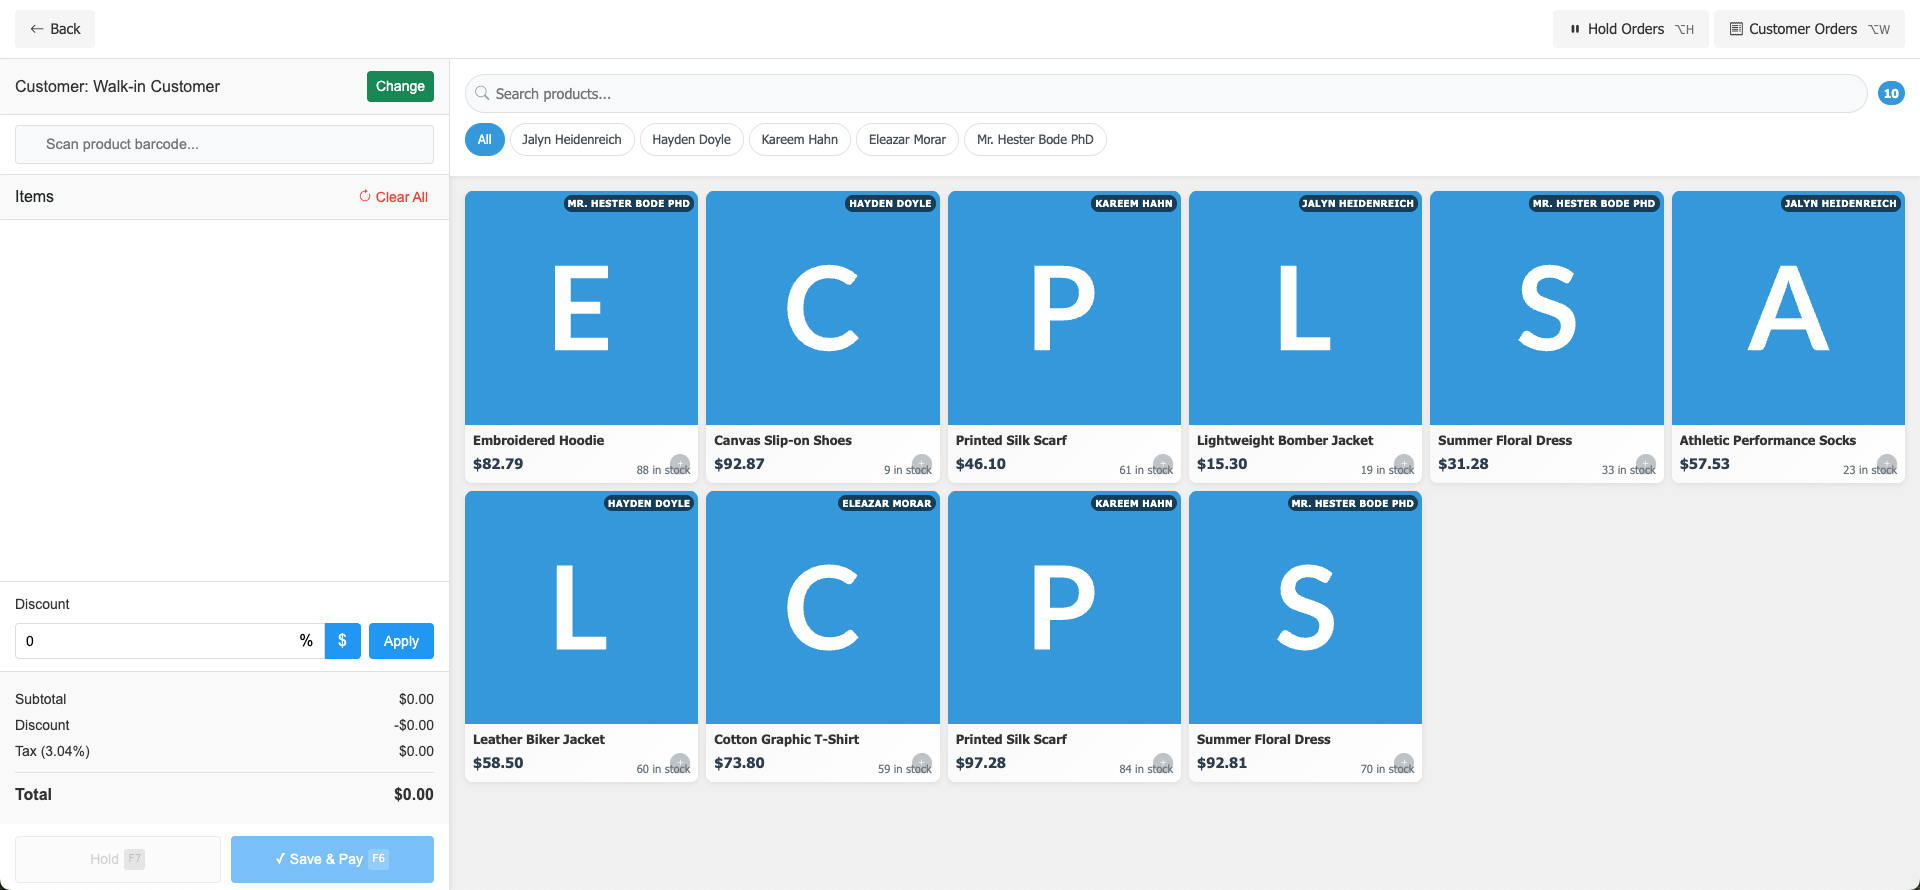
By default, the customer is set as "Walk-in Customer."
If needed, click the Change button to select a specific customer.
Adding Products to the Sale
There are multiple ways to add products:
Method 1: Scanning Barcode
Place your cursor in the "Scan product barcode..." field.
Use a barcode scanner to scan the product.
The item will automatically be added to the transaction.
Method 2: Browsing Products
Use the product display grid to find items.
For easier browsing, use the filter tabs at the top to view products by vendor:
Click All to see all products
Or select a specific vendor (Jalyn Heidenreich, Hayden Doyle, etc.)
Click on a product to add it to the cart.
Method 3: Searching
Click in the "Search products..." field.
Type the name of the product you're looking for.
Select the product from the search results.
Applying Discounts
In the Discount section, enter the discount amount.
Select whether it's a percentage (%) or dollar amount ($) using the toggle.
Click Apply to add the discount to the transaction.
Reviewing the Transaction
Before finalizing, review:
The items added to the transaction
The subtotal amount
Any discounts applied
The tax amount (calculated at 3.04%)
The final total
Completing the Sale
Click Save & Pay (F6) to proceed to the payment screen.
Select the payment method (cash, card, etc.).
Process the payment according to the selected method.
The system will generate a receipt.
Managing In-Progress Transactions
Holding a Transaction
If a customer needs time or wants to add more items later:
Click Hold (F7) to save the current transaction.
The transaction will be stored in the system for retrieval.
Retrieving Held Orders
Click Hold Orders (⌘H) at the top right of the screen.
Select the transaction you want to retrieve.
Continue processing the sale as normal.
Customer Management
Accessing Customer History
Click Customer Orders (⌘W) at the top right.
Search for the specific customer.
View their previous transactions and purchase history.
Changing the Active Customer
Click the Change button next to the current customer name.
Search for the customer by name, phone, or email.
Select the customer from the results.
The transaction will now be associated with this customer.
Quick Tips
Clear All: To remove all items from the current transaction, click the "Clear All" button.
Stock Levels: Each product shows the current stock level (e.g., "88 in stock").
Keyboard Shortcuts: Use ⌘H for Hold Orders, ⌘W for Customer Orders, F7 for Hold, and F6 for Save & Pay.
Back Navigation: Click the back arrow (←) to return to the previous screen.
Troubleshooting
If you encounter issues:
Check the URL to ensure you're on the correct system (staging or production).
For inventory discrepancies, check the stock count displayed on the product card.
If the system is unresponsive, try refreshing the page.
For persistent issues, contact your system administrator.
This guide covers the basic operations of the xPOS system. For advanced features or specific questions, please refer to the complete system documentation or contact support.